Saturday, January 21, 2012

Valentine's Wood Letters


I love to cut out words on my saw.  I did a bunch for Christmas and decided I better get going on my Valentine's Day words.  I can't believe that Valentine's Day is a few weeks away!!!  WOW!!  I am so excited about the fonts I used.  One of the kisses and one of the love words I've cut small lips or hearts that pop out.  The dot on the "I" has three options to choose from.  Who doesn't like a choice?!?  You can have a heart, lips or a Hershey's kiss!  The hearts used for "O" have a smaller heart cut out of the middle to add dimension.  The "Be Mine" was designed with the idea that the word BE would be printed on the front of the heart used as the dot for the "I". 

I hope you all have a very wonderful Valentine's Day!


Here is link to my wood website  woodluv2.blogspot.com or if your interested in ordering

you can check out my Etsy site.  ORDER HERE
Let me know what you think!  I also do custom orders.  If there is something you're looking for let me know!  :0)

Thursday, January 19, 2012

Bady Animal Wall Hangings to match Baby Blanket


Here are the wall hangings I was telling you about.  (They are made from the same pattern as my quilt.)
To hang:   On the top of the outside boarder I cut a small hole on the back about and inch from the end.  I then cut up a wire hanger.   I made it about 3 inches longer than the boarder.  I then turned in the ends 1.5 inches each.  This will keep the ends from poking through the fabric.  I then thread it through the hole.  The seal the hole and make sure it didn't fray I put fray no more on the edges of my hole.    (Sew down the ribbon before putting in the hanger!)  :0)  

*The boarder is sewed on like a binding. There is a loop of material for the hanger to fit inside of. 

Pieced Animal Baby Blanket


I had just found out I was pregnant and my mother in law wanted an idea for something to give me for my birthday.  I really wanted to make a baby quilt.  So she gave me a gift certificate to my favorite fabric store.  I was so excited and I just couldn't wait to find out what I was having before making the quilt.  So I decided to make two.  One for a girl and one for a boy.  (I'll post pictures of my daughters quilt next week!) 
This is my favorite one!  I loved the farm animals.  I don't follow the regular quilters rules.  I kinda fly by the seat of my pants.  I don't follow patterns.  I find a picture or idea of what I like, take the idea and make it my own. 
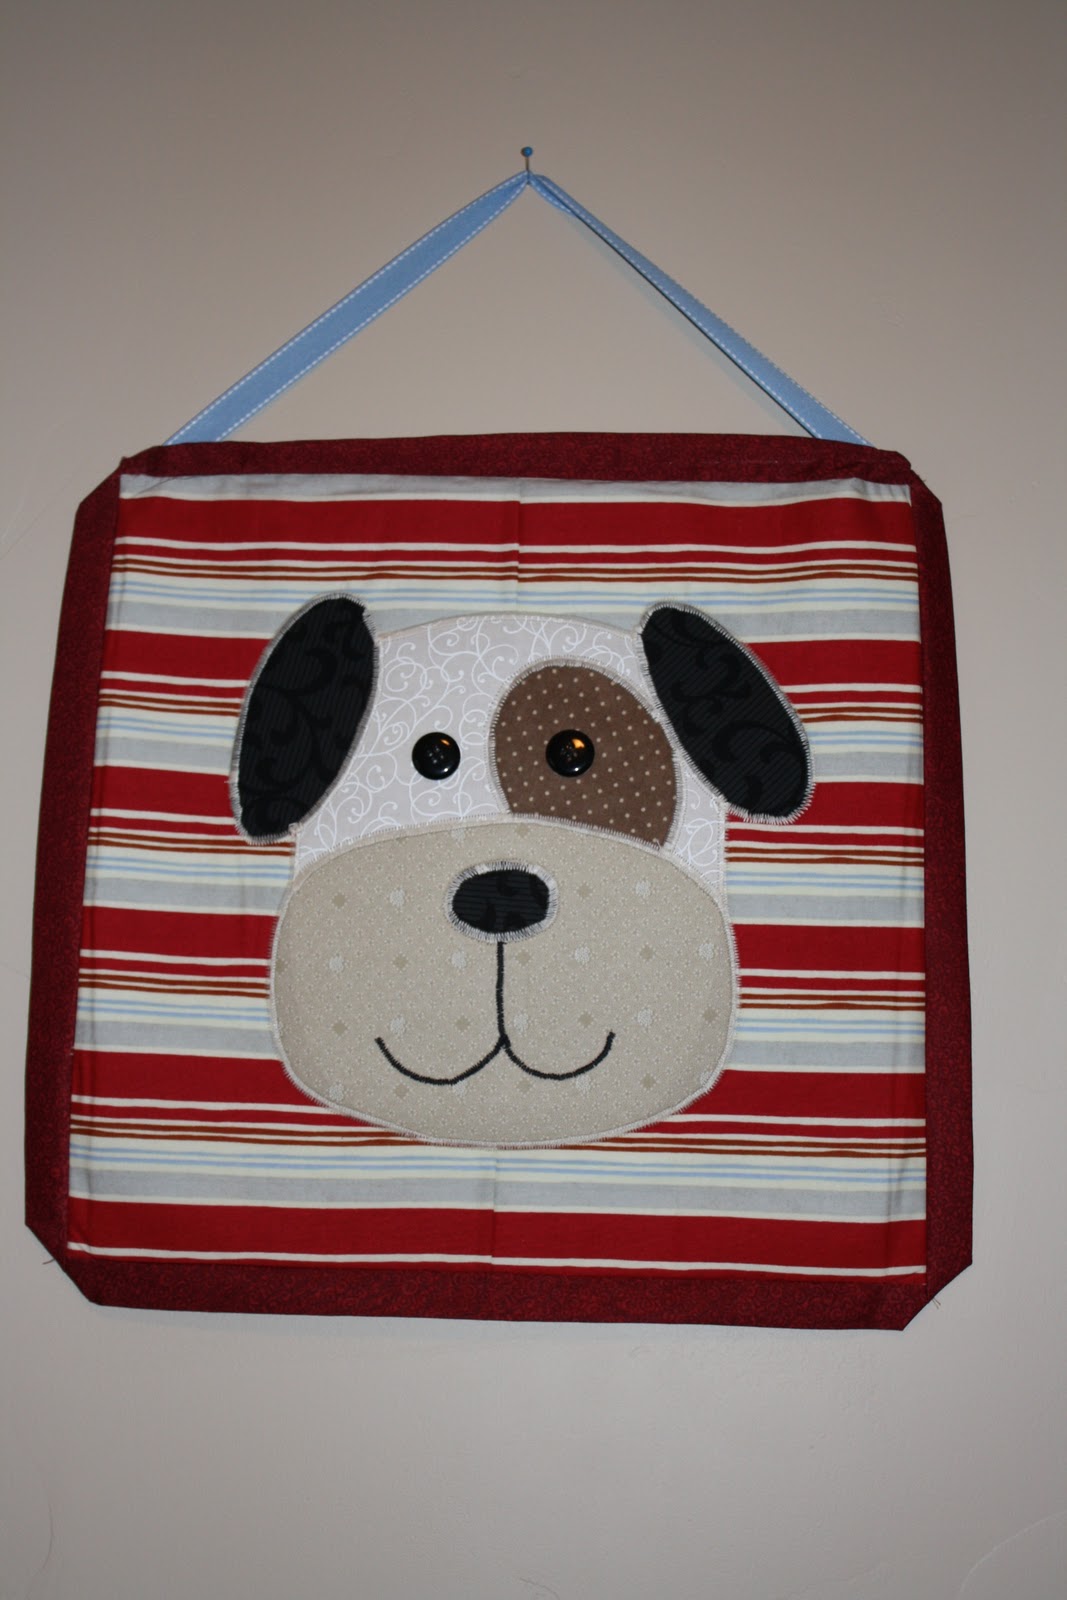
For quilting I do make a grid on paper and figure out the sizes of squares and different colors and patterns for materials.  (I really wanted to use and red and blue.)  Then I decided what colors I wanted the animals.  I drew a mini of each and animal and colored it so I had a good idea the colors I wanted and that they all went went well together.  (I found 3 different quilts with animals on them.  I then copied the look of the animals I liked)  I drew out the animals and cut out each piece for my pattern.  I iron them on where I want them  and then dig zag over them to make sure the seams are secure. (Someone suggested I use buttons for the eyes.  I used buttons on the wall hanging but not on the quilt.  I didn't want the baby to get snaged or be ripping them off on the quilt.)

After my daughter I put this in a closet hoping we would one day have a little boy to call this his own.  My daughter was only 4 months old when we found out we were expecting our little cowboy!  I was SHOCKED we were having another one so soon!  But when we found out it was a boy I was so excited!  I pulled out the quilt.  I then also creating wall hangings (WHICH I'LL POST NEXT) to match the quilt and tie it all together. 

Our sweet baby boy was born and left my arms on August 1, 2011.  Our little cowboy is missed everyday!  But how very lucky we are to have him in our family! 

Someday I hope to have another little cowboy!  When we are blessed that day, I will once again pull out this quilt!  

Monday, January 16, 2012

DIY rug for your kids

Buying a rug for your kids is expensive.  So why not cut the cost in half and do it yourself.  This way you can make the rug fit any the theme of any room.

I decorate my classroom with frogs!  Lots of frogs.  I wanted a rug with a pond.  I took a carpet remnant and regular tempera paint and spray paint.  I painted what I wanted on the rug with tempera paint.  It lasts and looks great!  I didn't have to touch it up for 7 years.  Once it faded I just reapplied the paint.  I did use spray paint on some of it to save time and arm work.  It held up just as well as the tempera and wasn't rough to touch like the tempera paint.  I would suggest using the spray paint as much as possible but the tempera is great for fine detail.  :0)   


Friday, January 13, 2012

Fun for a kids room or play room

I made these cute dolls about ten years ago.  They have been in three different schools and are now in my preschool.  They hold up great!  The only thing that gets hammered is the hands and feet but the great thing about it is they are very easy and cheap to replace!!! 

Years ago they made stickers that looked like these cute dolls.  I took the stickers and put them on a over head projector.  Then I traced them on foam board.  The most difficult part was cutting it out.  I used a razor and it went a lot faster.  Then I painted the dolls with tempera paint.  The hair, arms and feet are all pipe cleaners.  (Like I said easy and cheap to replace!)  The pipe cleaner just pokes into the foam on the side.  (Some hair I glued down.) 

I painted some of the dolls specific colors.  I wanted to teach the kids colors but not just have some dumb punch out from the teachers store.  I love FUN in the classroom!!!  I think most of what I used in the classroom was things I made.  The more I love what I do, the more the kids will love learning and what we do!! 

Tip:  To hang the easiest thing is a straight pin that I place in the middle of their chin.  I tried lots of other things but one straight pin does a great job!

Hope you like!!!!


Share Chair

My dad and I are so much alike.  I believe I get my desire to be creative from him.  We both love to create things and we both have the same faulty wiring.  When we are creating something new and fun we both can't sleep until it's done.  My mom always told me to stop rushing through it and enjoy it.  Well, I do enjoy being crafty and creative but I also enjoy my sleep.  So, I enjoy the process but don't waste much time!  :0)

When I was about to graduate with my teachers certificate (wow!! a very long time ago) I wanted a fun and special little chair to put in my classroom.  I wanted to call it the Share Chair.  I decided I would not have Show and Tell but Show and Teach.  Each child would get one turn in the year to bring something that they could teach the whole class about.  It could be anything but they had to teach the rest of the kids.  It was so fun!  During their Show and Teach time they got to sit on the special Share Chair.  The kids loved the time to teach the class but also looked forward to sitting in the chair.

I asked my dad if he could make a cute little chair out of the horseshoes in the garage.  My dad is amazing and has some really neat things he has welded out of horse shoes.  He whipped this together and I will treasure it forever. 

I think this will be a special chair for my children that their grandpa made!! 


|


Friday, January 6, 2012

Winter/Christmas Pillows


I wanted to make some cute pillows that could last all winter.  I LOVE snowmen so decided to use them on my pillows.  I didn't find any patterns I loved, but I did find a lot of cute snowmen things that I really liked.  So I took the patterns and ideas found on other things and applied to the pillows.  For instance, the long snowmen pillow is a wall hanging that I found, one of them I saw on a cute mug and so on.  I decided to paint some and to do a running stich on the others.  I cut out a plain piece of material.  Then I decided to add a cute boarder of christmas material.  (The squares were cut at 4") and then I added a 2" strip on the outside to set the boarder off.  I then picked a cute winter material to put on the back. 

Christmas tree skirt

I wanted to make my mom a Christmas tree skirt to go with the ornaments I made her some years back.  I heard all about the 10 degree wedge ruler, but I couldn't find one.  So I made my own wedge pattern out of a paper bag and used it.  It worked ok, but a wedge ruler would have been more accurate and easier.  All in all it worked great.  I then used a plain material on the back to finish it.

I got my idea from  http://cre8tivequilter.blogspot.com/2007/12/making-of-tree-skirt.html.  I just had to change it a little because her skirt fits a smaller tree.